

DIY Silhouette Portrait Art Ornament Keepsake
Today I am sharing how I last minute did these DIY silhouette portrait art ornament keepsake. This makes a great gift for family members who “already have everything.” Each year, it seems like the holidays get harder and harder to shop for family members so when I came across this idea for a gift, I knew it was going to be perfect. Sentimental and cute. What a win!

To start, here is what you’ll need:
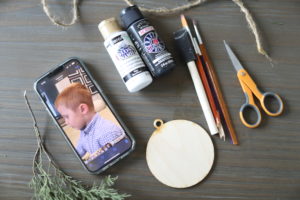
- A photo in profile view. It’s best when you are eye level. Keep in mind rotation of the head. If head is looking down, your final work will be looking down also.
- A printer.
- A computer and application to shrink or stretch photo. I used microsoft word.
- Ornament Tags linked here
- Foam brush
- Micro detail paint brush
- Detail edge scissors
- White and black acrylic paint
- Twine
- Ribbon
Steps.
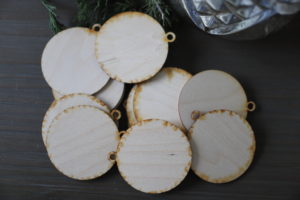
First I take the white acrylic paint and use the foam brush to paint 2-3 coats onto the wood ornaments. I usually wait a few hours before I apply the second coat. I only did it to the front but you could do both sides if you wanted.
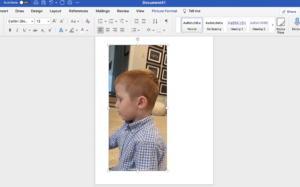
Next, I uploaded the picture into microsoft word. Then, I cropped the photo to the size I needed which was going to be roughly 2.5 in. x 2.5 in. After that, I flipped the photo across the x axis so that the direction of his head was facing to the right. (You don’t have to do this step but I had another one made already and I wanted all the faces to be looking in the same direction.)

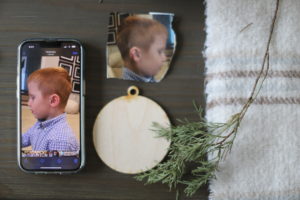
Then I printed it. Once I printed it, I cut around the face and shirt collar as precisely as I could. 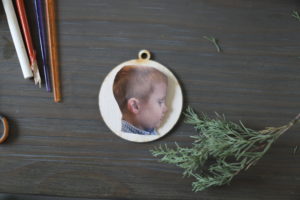
After I know the ornament is dry from painting it white, I take a pen and trace around the silhouette as precisely as possible. Pay attention to make sure you aren’t shifting the picture as you trace around it Once it is traced, I then take the black acrylic paint and the detail micro brush to fill it all in. I do several coats of this as well. Use the different color paints to touch up areas where needed. I added little eyelashes and a hair flip with a fine tip gel ink pen to the baby girls portraits for extra detail. Complete it with twine and ribbon! Simple, inexpensive, and easy and I love the way it turned out!!
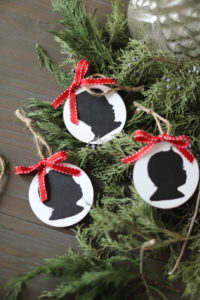

Thanks so much for reading! I have silhouette art in several places in our home because it’s personalized, cheap, and easy! I will try and do a tutorial in the future on how to do larger scale pieces. But in the meantime, thanks for stopping by! Merry Christmas!

See More Posts
3 Easy & Inexpensive Ways to Upgrade your Christmas Decor
2022 Goals For Hayden Interiors and 4 Ways to Love Your Home Right Now
A Little Bit On How I Got Here
![]()

Previous Post
Next Post
Where we discuss all things design, obviously.
DESIGN
Browse Category
For more of our latest projects, follow along on instagram at @hayden_interiors
© Hayden interiors 2021 | design & Photos by Sara Hayden
Intentional Design for Beautiful Spaces
Jackson, Tennessee
+ Show / Hide Comments
Share to: